

"Capture image" configuration dialog
This dialog allows to enable / disable "Save captured image" operations for processed streams and set parameters of "Save captured image" operations.
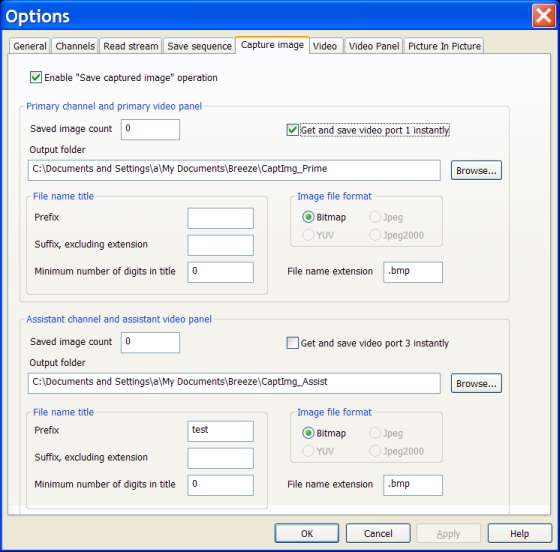
"Enable 'Save captured image' operation" check box
The following options are available in this dialog:
"Enable 'Save captured image' operation" check box
Enables / disables "Save captured image" operations for both channels.
"Save image count" edit box
This edit box allows you to set a start number which will be used as a reference for counting captured images. It can be reset any time to a new number.
"Get and save video port 1(3) instantly" check box
Enable / disable instant copying of image from the main video output port to the auxiliary "pocket" video port and then saving of copied image to the file.This operation is initiated by clicking buttons "Get" in the Controller panel .
If this check box is unchecked then captured images is just copied to the auxiliary "pocket" video port.
There are two "Get" buttons in the Controller panel . Upper "Get" button initiates capture of image from the video port 1 to the video port 2 (primary channel). Lower "Get" button initiates capture of image from the video port 3 to the video port 4 (assistant channel).
Capturing an image from the main port of the channel with a "Get" button, and instant saving captured image to the file is called in short "Capture image from the channel".
"Capture image from the channel" operation is similar to the capturing an image from the video panel "As Is", with instant saving that captured image to file. Capture "Video panel" operations is initiated by clicking buttons in the "Channel" toolbar or corresponding items in the "Channel" menu .
At the same time, there is a substantial difference between these two operations, between "Capture image from the channel", on the one hand, and "Capture video panel", on the other hand.
In the case of the "Capture image from the channel" operation, image is always captured from the video port 1 (primary channel) or video port 3 (assistant channel) as it is generated by the channel itself. No filtering or "Picture In Picture" operations are applied to the captured image.
Instead, image captured from the video panel "As Is" may present any video port currently selected into the video panel (see "Controller panel" topic). If filtering or "Picture In Picture" operations are applied to the image currently displayed in the video panel then captured image will reflect all those changes.
One important usage of "Get" image operation without instant saving to the file is making "screen shuts" of frames from the playing video sequence in real time, and instant displaying them in the video panel as a sole image or as a "Picture In Picture" (base image or inserted image, depending of the selected configuration of Breeze).
Also, capture image operations of both types can be used effectively together. At the first step image can be captured from the channel and instantly displayed as a "Picture In Picture". Then, at the second step, newly formed "Picture In Picture" image displayed in video panel may be captured from the video panel "As Is" and saved to the file.
"Output folder" edit box
In this edit box you have to specify full path to the folder where files containing caputred image will be saved.You can do it manually or in the "Select folder" file manager dialog . To open "Select folder" dialog click button "Browse..." placed to the right of the "Output folder" edit box.
"File name title" group box
In this group box you have to specify components of file name title. That title will be used in the file name of saved captured images.
"Prefix" edit box
Specify in this edit box a prefix (the very first part) of the file name title.
"Suffix" edit box
Specify in this edit box a suffix (the very last part) of the file name title.
"Minimum number of digits in title" edit box
Specify in this edit box a minimum number of digits in the digital root (middle part) of the file name title.
"Image file format" group box
In this group box you have to specify a format of files where captured images will be saved into.
"File name extension" edit box
Use this edit box if you want to specify a file name extension different from the default file name extension defined for the selected file format.
Remarks
"Capture image" operation allows to capture images from the channels in the "View" and "Play" modes. Images can be captured in real time from the input streams during direct "Play", or during "Replay" from the frame cash buffers."Capture image" operation is initiated by the clicking button "Get" in the controller panel of a browser window . There two "Get" buttons in the controller panel; upper one is associated with the primary channel, and lower one is associated with the assistant channel.
When button "Get" is clicked, image from the main video output port of the channel is saved to the auxiliary "pocket" video output port of the channel.
Image from the "pocket" video port can also be instantly saved to the file / files on the disk, if "Get and save image instantly" check box associated with the selected channel is checked. If this check box is unchecked then captured image is just saved to the "pocket video" port. Captured image kept in the "pocket" video port can any time be saved to the file by clicking button "Save". There two "Save" buttons in the controller panel; upper one is associated with the primary channel, and lower one is associated with the assistant channel.
Table below shows main and "pocket" video ports associated with the primary and assistant channels.
| Channel | Main video output port No. | "Pocket" video output port No. |
| Primary | 1 | 2 |
| Assistant | 3 | 4 |
If each captured image is saved to the separate file then names of files are sequentially numbered and ordered by the Breeze. Title of the saved file name includes prefix, digital root and suffix. Digital root is a fixed length text consisting of the decimal digit characters. Root is made by the converting an order number of the captured frame into text. During mass "Capture image" operations prefix and suffix are constant for all saved files, but digital root is changing according to the order number of the captured image.
There are two main panels in "Capture image" dialog, upper panel and lower panel. Upper panel is associated with the primary channel, and lower panel is associated with the assistant channel.